
Social Workflows
Skincare Product Photography at Home With Just a Phone
You can shoot skincare and beauty products at home with a phone, a window and a few household props. Here is the setup, how to handle glossy bottles and texture, and how to turn the shots into a week of posts.
Kushal Shrestha
Marketing & Engineering
10 min read

In short
- Shoot beside a window in soft, indirect daylight with the phone held steady, and turn off the flash.
- Pick one plain background per shoot, and use white card and a dark card to control glare on glossy bottles.
- Take four kinds of shot per product: the whole pack, a close-up of the label, a texture shot and a scale shot in a hand.
- Show texture as it looks, and keep captions to what the product is and how it is used, with no claims about skin or results.
- Sort the shots into a week of posts, then draft and approve each one before it goes out.
Good skincare product photography at home needs only a phone, a window and a plain background. Shoot in soft daylight beside the window, use white and dark card to control reflections on glossy bottles, and take four shots per product: the whole pack, the label, the texture and the product in a hand. This article is for owners of small skincare and beauty brands who take the photos and also run the marketing.
You will leave with a simple setup, fixes for bottle reflections, a shot list per product and a way to turn one session into a week of posts.
Start with light from one window
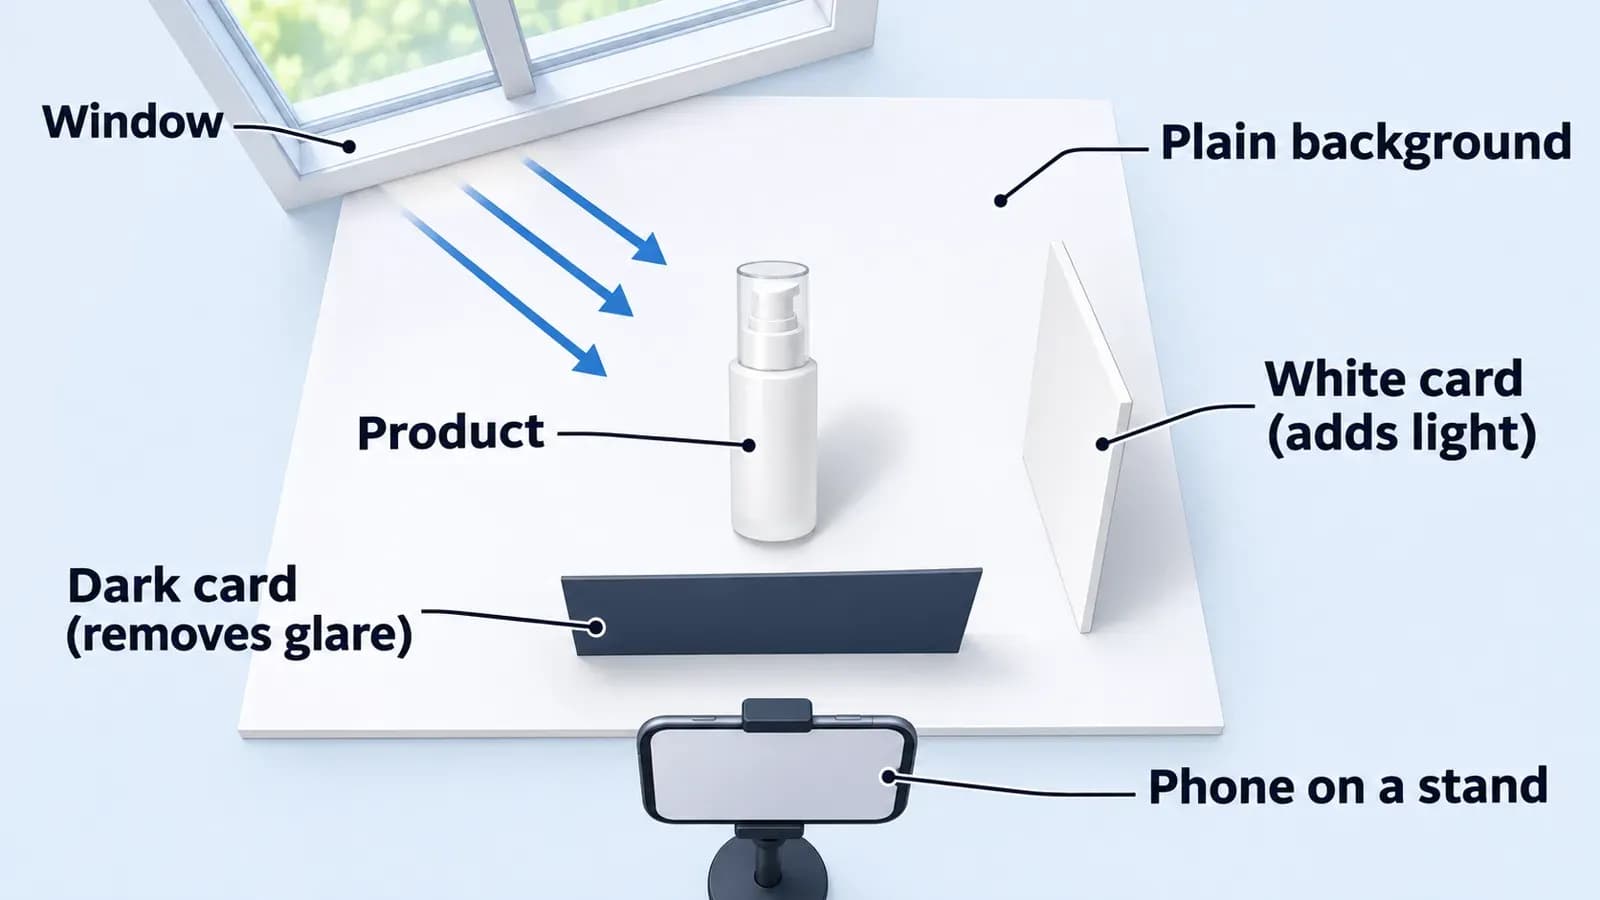
Light is the first thing to get right. A phone camera can take a clear product photo when the light is soft and comes from one direction.
- Use a window, not a lamp. Put a small table beside a window that gets bright but not direct sun. Direct sun makes hard shadows and bright patches on packaging. If the sun is strong, hang a thin white sheet or net curtain over the glass.
- Turn the flash off. Flash flattens the product and leaves a hot white spot on every glossy surface.
- Turn off the room lights. Mixed light makes colours look wrong.
- Keep the side with no window lighter. Prop a sheet of white card opposite the window. It bounces light back and softens the shadow.
Pick the time of day when the room is brightest and block it in your calendar. Consistent light helps photos look like one brand.
Hold the phone steady and set the frame
Blur and wonky angles make a photo look careless faster than a plain background does.
- Use a stand or a stack of books. A cheap phone stand, or a phone leaning on a stack of books, beats a shaking hand. You can then adjust the product without moving the camera.
- Turn on the grid. The grid in your camera settings helps keep bottles upright and horizontal lines level.
- Tap the product to focus, then drag the exposure slider until the pack looks like it does in the room. Pale packaging tends to come out grey, so nudge it brighter.
- Shoot a little wider than you need. Leave space around the product so you can crop to different shapes later: square, portrait or landscape.
Wipe the product before each shot, since fingerprints show on glossy packaging.
Choose a background that does not compete
For skincare, quiet backgrounds work best because the pack, the label and the colour of the product are the point.
| Background | Good for | Watch out for |
|---|---|---|
| White or off-white card | Clean catalogue-style shots, pale packaging | Pale packs can disappear, so add a soft shadow or a prop |
| Coloured paper or card | Making a pack stand out, matching brand colours | Colour bouncing onto the product; keep it away from white packaging |
| Wood, stone or tile | A warm, simple set feel | Busy grain, and reflections on shiny tile |
| A shelf or bathroom surface | Showing the product as it is kept and used | Clutter; clear everything that is not part of the shot |
Pick one background for a whole shoot. Photos on the same surface look planned, and nothing needs rebuilding between products.
Props should say something about the product. A cloth, a small dish, a leaf or a spoon is enough. If a prop does not explain what the product is or how it is used, take it out.
Tame reflections on bottles, tubes and jars
Glossy packaging reflects the window, the phone and you. Most reflection problems have a simple fix.
- A bright patch on the front of the bottle. Move the product or the window light a little to one side, or hang the sheet over the window to soften it. A large, soft light source makes a gentle highlight instead of a hard white spot.
- You can see yourself or the phone in the bottle. Stand to one side, or hold a dark cloth or card behind the phone so it does not reflect. Shooting a little off-centre helps too.
- A flat, washed-out look. Add a dark card at the front or side edge of the product, just out of frame. It adds contrast and defines the edges of glass and plastic.
- Dark glass looks like a black shape. Put a white card beside the bottle so its edge picks up a thin line of light.
- Foil or metallic labels flare. Tilt the product slightly until the label reads clearly. Small movements change reflections a lot.
Move one thing at a time and take a test shot after each change. If a reflection will not go away, try a different angle or take the shot with the bottle in a hand. Fixing it in the room is much quicker than fixing it afterwards.
Build a shot list for every product
Four shots per product cover most of what a shop and a feed need. Take them all in one go while the set is built.
- The whole pack, front on. A clean shot with the label readable. This is the product page photo, and the base for most posts.
- A close-up of the label. Show the name, size and what the product is called. A buyer who wants to read the pack can do so.
- A texture shot. Show the product itself: a swipe of cream on a clean tile, a line of gel on a spoon, a few drops from a pipette on a saucer. Use the same window light, and keep the background plain.
- A scale shot. Hold the product in a hand, or place it next to an everyday object, so a buyer can see how big it is.
For texture, show what the product looks like and nothing more. A smooth cream is just a smooth cream in a photo. Do not use a texture photo to suggest what the product does for anyone's skin. Keep the caption to what the product is, how it is used and what it is made for, in the same wording as your product page. If a rule applies to your category or your market, keep the claim wording you already use there.
If you want to plan posts from your product pages, the product page to Instagram week guide shows how to plan posts from what you already have. This article only covers what is specific to skincare and beauty packaging.
Edit lightly and keep a folder system
Editing should be quick. Use your phone's built-in editor.
- Crop to a clean shape and straighten any tilt.
- Brightness and contrast. Raise brightness a little if the photo looks grey. Add contrast only until the edges of the pack read clearly.
- Colour. Match the on-screen colour of the pack to the real one, and do not retouch the product itself. Buyers will notice when the parcel looks different from the photo.
Then save the photos where you can find them. A folder per product, with file names such as serum-front, serum-label, serum-texture and serum-hand, saves you hunting through your camera roll every week.
Turn the shots into posts
One photo session can feed several posts. Match each shot to a job, then write a short caption for it.
| Shot | Post idea | What the caption says |
|---|---|---|
| Whole pack | Product post | What it is, size, who it suits, where to find it |
| Label close-up | Ingredient or "what is in the pack" post | The details printed on the pack, in your existing wording |
| Texture | A close-up post | What it looks like and how much to use |
| Hand scale shot | A size post | How big it is |
| Shelf or hand spare | A routine post | A short, factual description of how it is used |
Use several shots in one post when you can. Lead with the clean whole-pack photo, then add the texture and scale shots as the next images. Keep the first sentence of every caption to the point.
For fuller plans, a weekly social content plan for a skincare brand shows how to spread product, process and update posts across a week. If you want to show a customer's own photos, the skincare before-and-after content checklist lists the checks to run first, including permission and claim wording.
The drafting is the other half of the job. Youanai Social builds a Business DNA profile from your website, capturing brand voice and offer rules, and drafts social posts from it. Every draft waits for your approval before anything is posted. There is a free way to start.
Worked example (hypothetical)
This example is hypothetical, with an invented brand, to show the method. It contains no real results and none are claimed.
Imagine a hypothetical one-person brand that sells a face wash, a body butter and a lip balm. The owner clears one Sunday morning and sets up beside a bedroom window with a white sheet over the glass, a white card on the far side and a sheet of pale green paper as the background.
The shoot. For each of the three products, the owner takes the four shots from the list. The body butter jar is glossy, so a dark card goes at the front edge to get rid of a white patch. The lip balm is tiny, so the hand shot does most of the work.
The posts. The owner uses the whole-pack shots for three product posts, the label close-ups for a "what is in the jar" post that copies the wording from the product pages, and the texture shots for a close-up post with a short factual caption. The hand shots go into a size post.
The review. The owner opens the Business DNA profile built from the shop's website, drafts captions from it, then reads every draft against a short checklist: first sentence says the point, product named plainly, one next step, no claims about skin or results. Some captions lose a sentence of hype. Every post is approved, and nothing goes out before that.
Common mistakes with skincare product photos
- Using the flash. It adds a hard patch of light and flattens the pack.
- Retouching the product. A pack that looks different from the real one will confuse buyers.
- Texture photos used as claims. Show what the product looks like. Leave out any suggestion of what it does for skin or health.
- Skipping the draft check. Read every caption before it goes out.
FAQ
How do I take good photos of skincare products at home?
Shoot beside a window in soft daylight with the flash off, use a plain background and keep the phone steady on a stand. Take a whole-pack shot, a label close-up, a texture shot and a hand shot for each product.
What is the best background for skincare product photos?
A plain, quiet surface is best, such as white card, coloured paper, stone or smooth fabric. Pick one background for the whole shoot so the photos look like a set, and choose a colour that does not clash with the pack.
How do I stop glare on glossy bottles and jars?
Soften the light with a thin white sheet over the window, then move the product, the light or the camera a little at a time. A dark card at the edge adds contrast, and a white card adds a gentle line of light on dark glass.
How do I photograph product texture?
Place a small amount of the product on a clean plain surface, such as a tile, saucer or spoon, and shoot it close in the same window light. Show what it looks like, and keep the caption to the product and how it is used rather than what it does for skin.
How many photos should I take of each product?
Four is a good starting point: the whole pack, the label, the texture and the product in a hand. Take a few spare frames of each as well, so you have choices when you draft your posts.
How do I turn product photos into social posts?
Match each shot to a job, such as a product post, a label post, a texture close-up or a size post, then write a short caption for each. Draft the week together and approve every draft before it goes out. Youanai Social can draft captions from your Business DNA, and every draft waits for your approval before anything is posted.
Keep reading
Best Hashtags for Instagram: A Small Set for Product Shops
The best hashtags for a one-person product shop are the ones that describe the post honestly. Build a small set in four…

10 min read
Christmas Instagram Story Ideas for a Small Product Shop

A one-person shop does not need a big holiday campaign. Pick a few story types, spread them across the run-up to Christmas,…

10 min read
What to Post on Facebook: A Weekly Mix for Small Brands

A one-person product shop does not need a big content plan for Facebook. Pick a few post types that suit the page,…
9 min read